
LSF client on macOS - submitting from your laptop

In traditional HPC environments, login nodes are typically used as an access point for users to submit and manage jobs. Although login nodes are still used today, HPC environments are increasingly being used by a broad class of users with domain expertise and not necessarily IT experts. In other words, such users may be more comfortable using their native desktop environment rather than the CLI. Given the factors, in the commercial HPC space, organizations are always looking for ways to lower the bar to access and interact with HPC environments.
Spectrum LSF provides many ways to submit and manage jobs in an HPC cluster. For power users, the rich CLI functionality exists. There is also a web-based interface available for job submission and management which provides customizable application templates to greatly simplify job submission, while hiding complexity of the underlying infrastructure. A RESTful API is also available to users of IBM Spectrum LSF Application Center or IBM Spectrum LSF Suites, which enables organizations to access the HPC environment via web services.
I’ve written previously in detail about the the LSF web-based interface in the blog The Easy HPC Button. Here, we’ll take a closer look at the available LSF client for macOS that uses the RESTful API. First, a bit about LSF clients. LSF clients can access resources on LSF server hosts without running the LSF daemons. LSF clients don’t require a software license and from clients, users can run all of the familiar LSF commands. Additionally, LSF clients are submit only, and don’t execute jobs.
Note: The macOS LSF client uses the LSF RESTful API. This means that it will function in environments running LSF Standard Edition with LSF Application Center or LSF Suites.
Configuration
The configuration used for the example below is as follows:
| Hostname | OS | Detail |
|---|---|---|
| kilenc | CentOS Stream 8.4 | LSF Suite for HPC v10.2.0.13 |
| My-Macbook-Air | macOS Ventura 13.2.1 (Apple M1) | LSF client |
- On the Spectrum LSF Suite for HPC management host (kilenc), add the following variables to the Parameter section in the file lsf.cluster.name. The FLOAT_CLIENTS variable determines how many floating clients can join the LSF cluster, The FLOAT_CLIENTS_ADDR_RANGE specifies the allowable IP addresses. In this case, the client system is on a 192.168.x.x network.
Begin Parameters
FLOAT_CLIENTS=2
FLOAT_CLIENTS_ADDR_RANGE=192.*
End Parameters- To make the changes take effect, issue the following commands as the LSF administrator:
lsadmin reconfig
badmin reconfig-
Obtain the tarball pacdesktop_client10.2.0.13_macos-x86_64.tar. For users with an LSF entitlement this package is available on IBM Fix Central. Note that this package will work on systems with Apple M1 silicon through emulation.
-
Open a Terminal on the macOS client system, copy the tarball to the $HOME/Desktop directory of user lsfuser and uncompress the tarball.
lsfuser@My-MacBook-Air Desktop % pwd
/Users/lsfuser/Desktop
lsfuser@My-MacBook-Air Desktop % ls -la pacdesktop_client10.2.0.13_macos-x86_64.tar
-rw-r--r--@ 1 lsfuser  staff  18452480 27 Feb 17:12 pacdesktop_client10.2.0.13_macos-x86_64.tar
lsfuser@My-MacBook-Air Desktop % tar -xvf pacdesktop_client10.2.0.13_macos-x86_64.tar
x LSF_Desktop_Client/
x LSF_Desktop_Client/bapp
x LSF_Desktop_Client/btop
x LSF_Desktop_Client/bwait
x LSF_Desktop_Client/lseligible
x LSF_Desktop_Client/bsla
x LSF_Desktop_Client/blparams
x LSF_Desktop_Client/bhpart
x LSF_Desktop_Client/bclusters
x LSF_Desktop_Client/blstartup
x LSF_Desktop_Client/lsacct
x LSF_Desktop_Client/bsub
x LSF_Desktop_Client/bugroup
x LSF_Desktop_Client/bpeek
x LSF_Desktop_Client/bacct
x LSF_Desktop_Client/brequeue
x LSF_Desktop_Client/bjgroup
x LSF_Desktop_Client/bslots
x LSF_Desktop_Client/lsrun
x LSF_Desktop_Client/bjobs
x LSF_Desktop_Client/lshosts
x LSF_Desktop_Client/lsload
x LSF_Desktop_Client/brlainfo
x LSF_Desktop_Client/bresources
x LSF_Desktop_Client/bladmin
x LSF_Desktop_Client/bstatus
x LSF_Desktop_Client/bmod
x LSF_Desktop_Client/bpost
x LSF_Desktop_Client/lsid
x LSF_Desktop_Client/bentags
x LSF_Desktop_Client/ch
x LSF_Desktop_Client/bchkpnt
x LSF_Desktop_Client/bparams
x LSF_Desktop_Client/bjdepinfo
x LSF_Desktop_Client/bgmod
x LSF_Desktop_Client/brestart
x LSF_Desktop_Client/lsltasks
x LSF_Desktop_Client/blusers
x LSF_Desktop_Client/paclogon
x LSF_Desktop_Client/regnotify
x LSF_Desktop_Client/cacert.pem
x LSF_Desktop_Client/bresume
x LSF_Desktop_Client/blstat
x LSF_Desktop_Client/bhist
x LSF_Desktop_Client/bqueues
x LSF_Desktop_Client/bltasks
x LSF_Desktop_Client/bresize
x LSF_Desktop_Client/blcollect
x LSF_Desktop_Client/lsacctmrg
x LSF_Desktop_Client/bgadd
x LSF_Desktop_Client/bmig
x LSF_Desktop_Client/bstop
x LSF_Desktop_Client/bswitch
x LSF_Desktop_Client/blhosts
x LSF_Desktop_Client/blcstat
x LSF_Desktop_Client/brsvs
x LSF_Desktop_Client/brun
x LSF_Desktop_Client/blinfo
x LSF_Desktop_Client/lsgrun
x LSF_Desktop_Client/busers
x LSF_Desktop_Client/lsloadadj
x LSF_Desktop_Client/blkill
x LSF_Desktop_Client/bbot
x LSF_Desktop_Client/lsclusters
x LSF_Desktop_Client/bconf
x LSF_Desktop_Client/lsinfo
x LSF_Desktop_Client/lsmake
x LSF_Desktop_Client/blimits
x LSF_Desktop_Client/bmgroup
x LSF_Desktop_Client/bread
x LSF_Desktop_Client/bkill
x LSF_Desktop_Client/lstcsh
x LSF_Desktop_Client/lsrtasks
x LSF_Desktop_Client/README.TXT
x LSF_Desktop_Client/lsplace
x LSF_Desktop_Client/bhosts
x LSF_Desktop_Client/paclogout
x LSF_Desktop_Client/bgdel- Following the directions in the file README.TXT, set the environment variable LSF_DESKTOP_CLIENT=yes, and set the PATH variable accordingly.
lsfuser@My-MacBook-Air LSF_Desktop_Client % export LSF_DESKTOP_CLIENT=yes
lsfuser@My-MacBook-Air LSF_Desktop_Client % export PATH=`pwd`:$PATH- Next, it’s necessary to run the paclogon command to connect to the LSF Application Center (or LSF Suite installation). Here we point to the LSF server kilenc on port 8080.
lsfuser@My-MacBook-Air LSF_Desktop_Client % paclogon
Log on to IBM Spectrum LSF Application Center
User account: lsfuser
Enter password:
Specify the URL to connect to IBM Spectrum LSF Application Center. Format:
http://host_name:port_number/platform or https://host_name:port_number/platform
URL: http://kilenc:8080/platform
You have successfully logged on to IBM Spectrum LSF Application Center.- After successfully logging in using the paclogon command, it should be possible to run LSF “base” commands from the macOS terminal including lsid, lsload, lshosts.
lsfuser@My-MacBook-Air LSF_Desktop_Client % lsid
IBM Spectrum LSF 10.1.0.13, Apr 15 2022
Suite Edition: IBM Spectrum LSF Suite for HPC 10.2.0.13
Copyright International Business Machines Corp. 1992, 2016.
US Government Users Restricted Rights - Use, duplication or disclosure restricted by GSA ADP Schedule Contract with IBM Corp.

My cluster name is Klaszter
My master name is kilenc
lsfuser@My-MacBook-Air LSF_Desktop_Client % lshosts -w
HOST_NAME                       type       model  cpuf ncpus maxmem maxswp server RESOURCES
kilenc                    LINUXPPC64LE      POWER9  25.0    32  30.7G  15.8G    Yes (mg docker)
lsfuser@My-MacBook-Air LSF_Desktop_Client % lsload -w
HOST_NAME               status  r15s   r1m  r15m   ut    pg  ls    it   tmp   swp   mem
kilenc ok 0.8 2.1 2.4 7% 0.0 0 1156 551M 15.6G 10G- Next, run the LSF batch commands bqueues and bhosts.
lsfuser@My-MacBook-Air LSF_Desktop_Client % bqueues
QUEUE_NAME      PRIO STATUS          MAX JL/U JL/P JL/H NJOBS  PEND   RUN  SUSP
admin            50  Open:Active       -    -    -    -     0     0     0     0
owners           43  Open:Active       -    -    -    -     0     0     0     0
priority         43  Open:Active       -    -    -    - 75835 75803    32     0
night            40  Open:Inact        -    -    -    -     0     0     0     0
short            35  Open:Active       -    -    -    -     0     0     0     0
dataq            33  Open:Active       -    -    -    -     0     0     0     0
normal           30  Open:Active       -    -    -    -     0     0     0     0
interactive      30  Open:Active       -    -    -    -     0     0     0     0
sendq            30  Open:Active       -    -    -    -     0     0     0     0
idle             20  Open:Active       -    -    -    -     0     0     0     0
lsfuser@My-MacBook-Air LSF_Desktop_Client % bhosts
HOST_NAME          STATUS       JL/U    MAX  NJOBS    RUN  SSUSP  USUSP    RSV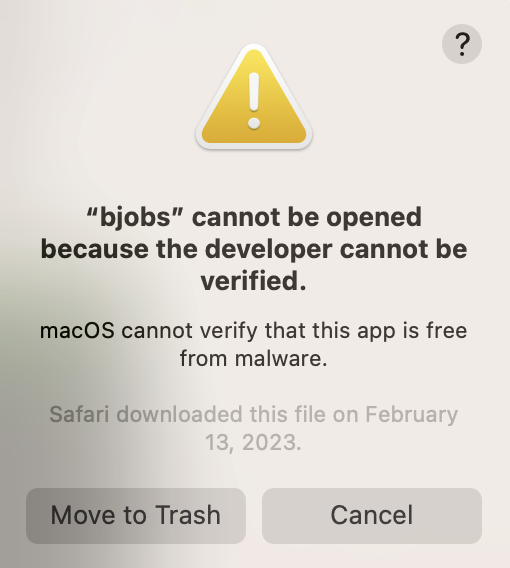
kilenc ok - 32 19 19 0 0 0- Running the bjobs will result in a warning message appearing on macOS stating: “bjobs” cannot be opened because the developer cannot be verified.
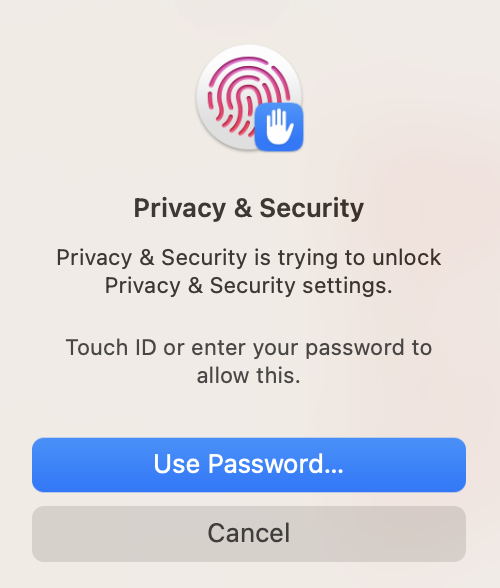
- To remedy the issue observed in step 9, click cancel on the warning message and browse to System Settings -> Privacy & Security -> Security Settings. In the Security Settings view, you’ll see the message: “bjobs” was blocked from use because it is not from an identified developer. To allow the bjobs command to execute, click on the Allow Anyway button. You will then be promped to authenticate to make the change take effect.

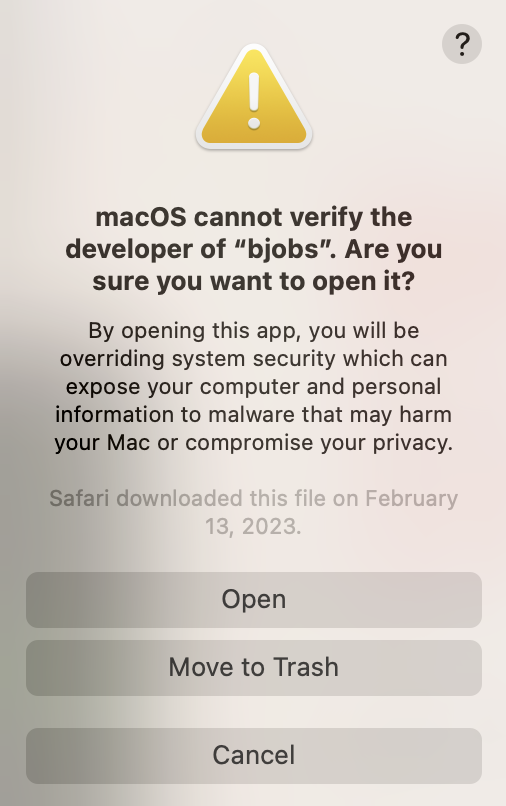
- Run the LSF bjobs command again. You will now receive a new warning error popup indicating: macOS cannot verify the developer of “bjobs”. Are you sure you want to open it?. To proceed, click on the Open button.The bjobs command will then run to completion as expected. Subsequent executions of bjobs will run without any system warnings. Finally, to submit a job, run the bsub command. Here we try to submit a simple sleep job (i.e. bsub -q normal sleep 3600). As was the case with the bjobs command, the bsub command is also blocked. Here, repeat the steps 10, 11 as described above but for the bsub command. Once the steps have been completed, repeat the bsub job submission command.
- Finally, to submit a job, run the bsub command. Here we try to submit a simple sleep job (i.e. bsub -q normal sleep 3600). As was the case with the bjobs command, the bsub command is also blocked. Here, repeat the steps 10, 11 as described above but for the bsub command. Once the steps have been completed, repeat the bsub job submission command.
lsfuser@My-MacBook-Air LSF_Desktop_Client % bsub -q normal sleep 3600
Job <617551> is submitted to queue <normal>.